Rooting the Tolino Shine (any Version) with Arduino (Due)
I have a Tolino Shine eBook reader (version 1.4.6). Although it is an Android operating system and it has WiFi, it is not possible to install additional apps or to download epubs and pdf from your own dropbox (better use OwnCloud). Thus, the only possibility to exchange data the old fashioned way via cable or sdcard. Unfortunately the root from link below does not work anymore (since version 1.2).
Solution
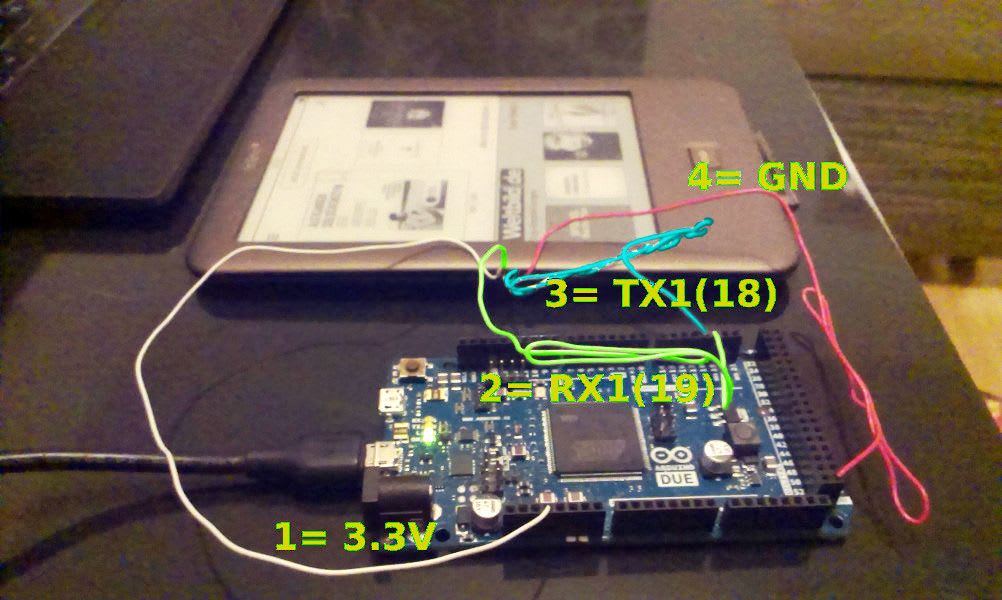
Thanks to Sven, he presented on his blog (http://www.livediesel.de/?p=581) another possibility. He figured out, that if you open the Tolino you can access a working serial interface with 3.3V (four tiny little wholes on the left side on the board). So, if you open the Tolino on the left side, a small chink of approximately 5mm should be sufficient enough (be carefully or you can damage the display), it is possible to stick in 4 cables (as depicted below). We made a hooks at the end of each cables and hooked them into these four little holes. Now you only have to attach these cables to the Arduino Due, which also runs with 3.3 Volts. Simply stick the first (white) into VCC 3.3Volts, the second (green) into RX1 (pin 19), the third (blue) into TX1 (pin 18) and finally the red cable into any GND. In our case the positions of TX and RX were contrary to those shown in: http://www.livediesel.de/?p=581).
That’s it, we are nearly done. The only thing that has to be done now, is to flash the Arduino with the following sketch:
String inputString = "\n";
boolean stringComplete = true;

void setup() {
    Serial.begin(9600);
    Serial1.begin(115000);
    inputString.reserve(200);

    Serial.println("*****************************************************************************");
    Serial.println("*                                     _ ______            _        __       *");
    Serial.println("*                                    (_)___  /           (_)      / _|      *");
    Serial.println("*  __      ____      ____      ____ _ _   / / __ _  ___   _ _ __ | |_ ___   *");
    Serial.println("*  \\ \\ /\\ / /\\ \\ /\\ / /\\ \\ /\\ / / _` | | / / / _` |/ __| | | '_ \\|  _/ _ \\  *");
    Serial.println("*   \\ V  V /  \\ V  V /  \\ V  V / (_| | |/ /_| (_| | (__ _| | | | | || (_) | *");
    Serial.println("*    \\_/\\_/    \\_/\\_/    \\_/\\_(_)__,_|_/_____\\__,_|\\___(_)_|_| |_|_| \\___/  *");
    Serial.println("*                                                                           *");
    Serial.println("*****************************************************************************");
}

void loop() {
    while(Serial1.available() > 0) {
        Serial.write(Serial1.read());
    }

    if (stringComplete) {
        Serial1.print(inputString);
        inputString = "";
        stringComplete = false;
    }
}

void serialEventRun(void) {
    if (Serial.available()) {
        serialEvent();
    }
}

void serialEvent() {
    while (Serial.available()) {
        char inChar = (char)Serial.read()
        if (inChar == '\n' || inChar == '\r') {
            stringComplete = true;
        }
        inputString += inChar;
    }
}
This sketch only translates commands from the Arduino Serial interface to Serial1 (Android) and all outputs back to Arduino. You can now start adb by entering the following command into the Arduino serial monitor. The result should look like the following:
*****************************************************************************
*                                     _ ______            _        __       *
*                                    (_)___  /           (_)      / _|      *
*  __      ____      ____      ____ _ _   / / __ _  ___   _ _ __ | |_ ___   *
*  \ \ /\ / /\ \ /\ / /\ \ /\ / / _` | | / / / _` |/ __| | | '_ \|  _/ _ \  *
*   \ V  V /  \ V  V /  \ V  V / (_| | |/ /_| (_| | (__ _| | | | | || (_) | *
*    \_/\_/    \_/\_/    \_/\_(_)__,_|_/_____\__,_|\___(_)_|_| |_|_| \___/  *
*                                                                           *
*****************************************************************************
bash-3.2# id
uid=0(root) gid=1007(log)
bash-3.2#
bash-3.2# start adbd
enabling adb
That's all folks, now you can apply the method presented in allesebook.de starting from step 8.
Manual Root via Arduino
But if you don’t want to install the Windows driver or even run Windows you can also proceed with this Arduino-Android shell. At first copy all apps from folder 3_adb from the download at ALLESebook.de Root-Paket 1.0 onto your Tolino-sdCard and then run the following commands. Because we had copied all files into folder /sdcard/Downloads/3_adb we proceed from there …
bash-3.2# pwd
/
bash-3.2# cd sdcard/Downloads/3_adb
bash-3.2# ls
com.smart.swkey
z_GoogleServicesFramework.apk
Superuser.apk
AdbWinUs.i.c6uaa.zk3
bash-3.2#
bash-3.2# cp busybox /data/local/busybox
bash-3.2# cp su /data/local/su
bash-3.2# cp Superuser.apk /data/local/Superuser.apk
bash-3.2# mount -o rw,remount /dev/block/mmcblk0p2 /system
EXT4-fs (mmcblk0p2): warning: maximal mount cotuknEXT4c-tbas2
bash-3.2#
bash-3.2# chmod 777 /data/local/busybox
bash-3.2# chmod 755 /data/local/su
bash-3.2# chmod 755 /data/local/Superuser.apk
bash-3.2# cat /data/local/busybox > /system/xbin/busybox
bash-3.2# chmod 777 /system/xbin/busybox
bash-3.2# /system/xbin/busybox --install -s /system/xbin
bash-3.2# busybox cp /data/local/Superuser.apk /system/app/Superuser.apk
bash-3.2# busybox cp /data/local/su /system/xbin/su
bash-3.2# ln -s /system/xbin/su /system/bin/su
link failed File exists
bash-3.2# chmod 6755 /system/xbin/su
bash-3.2# chmod 644 /system/app/Superuser.apk
bash-3.2# pm install z_GoogleServicesFramework.apk
	pkg: z_GoogleServicesFramework.apk
Success
bash-3.2# cp z_Vending.apk /system/app/Vending.apk
bash-3.2# chmod 644 /system/app/Vending.apk
bash-3.2# pm install z_LauncherPro-0.8.6.apk
	pkg: z_LauncherPro-0.8.6.apk
Success
bash-3.2# pm install z_Gallery3DFroyo.apk
	pkg: z_Gallery3DFroyo.apk
Success
bash-3.2# pm install z_cr3.0.55-19.apk
	pkg: z_cr3.0.55-19.apk
Success
bash-3.2# pm install z_SWkey36.apk
	pkg: z_SWkey36.apk
Success
bash-3.2# pm install z_tcandroid202.apk
	pkg: z_tcandroid202.apk
Success
bash-3.2# am start -n com.smart.swkey/.swkey
Starting: Intent { cmp=com.smart.swkey/.swkey }
bash-3.2# cp -r com.smart.swkey /data/data/com.smart.swkey
bash-3.2# chmod 6755 /data/data/com.smart.swkey
bash-3.2# reboot
The commands were taken from the installation batch file from that root.
Result
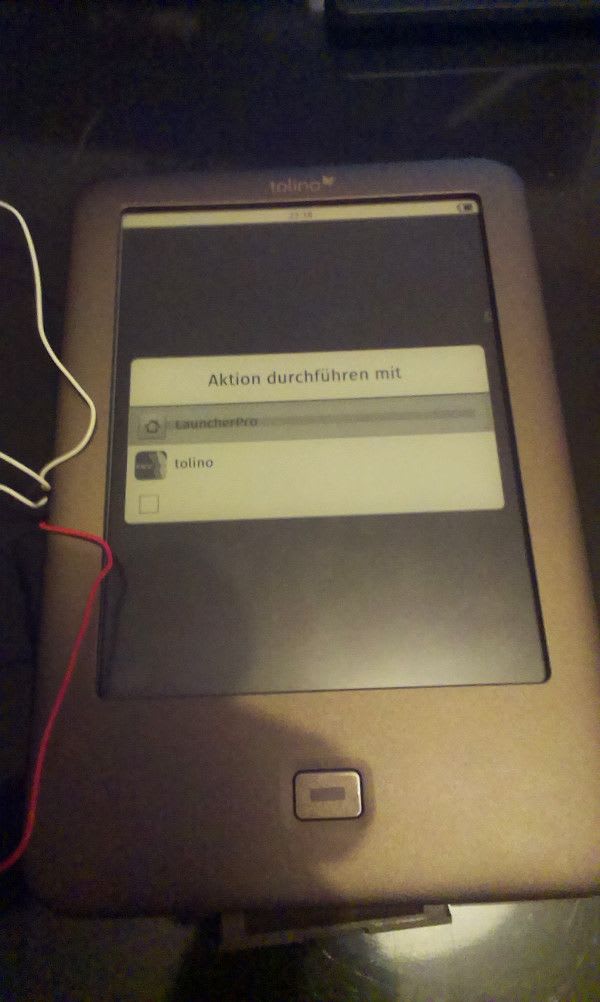
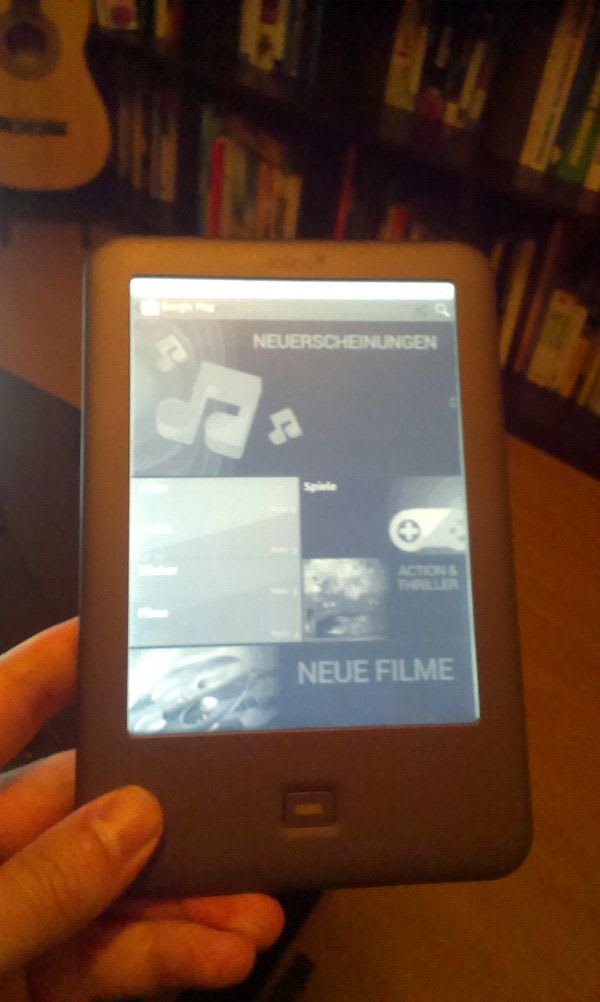
As you can see in the pictures below, after the reboot (and after choosing Launcher Pro) the Tolino Shine is a rooted and usable Android tablet. Even the GooglePlay Store is working and thus, no need for manual apk downloads.